Soft Mozart

Free Introductory Lesson

For children ages 5+ · Preparatory Level C

Musicians invite you to play Happy Birthday with the orchestra

You and your child — making music with the orchestra

Let's play Happy Birthday with the orchestra!

Start slowly.
Then perform at the regular tempo.

Play with the orchestra Begin preparing ↓
Music, note symbols, and piano keys

Soft Mozart · Free lesson

Learning to play and work independently

Introductory lesson · Preparatory Level C · Ages 5+

In this lesson
We will explore the characters of the Kingdom of Tune, practice Five Fingers, and work with interactive music theory modules. We will play the entire Happy Birthday piece hands separately and together, from memory and with the orchestra.

This lesson can be spread over several sessions. Choose the next step based on your child's results. Completing the earlier levels is not a prerequisite.

Begin with the Technology Lesson

Open “Getting to Know Soft Mozart”: explore the program, locate the modules and your results, learn to select a student's name, and connect your instrument. Then return to this lesson.

Download the complete lesson as a PDF

All learning materials are included in this introductory lesson and are available free of charge. The book, hands picture, cards, and animated song appear alongside the relevant activities. You do not need to find or buy them separately.

You can begin exploring on a computer, tablet, or smartphone. To play on a physical keyboard, you will need a MIDI connection; the Technology Lesson explains how to set it up.

Choose a section. Select its title to open the activity.

1. Teaching and learning: awareness and independence

Module 1. Your child and their development

Helping children ages five and up learn with awareness and independence

During the later preschool years and the beginning of school, children gradually learn to act with a purpose: keep a goal in mind, understand a task, choose an appropriate action, notice an error, and return to their work. The adult's role is to create conditions in which the child can work through this process independently.

In Soft Mozart, this process begins with the first actions at the piano. The student sees a symbol, finds a key, hears the result, and receives feedback. They can choose a small amount of work, review the numerical results, and decide what to do next. Organizing a session in this way helps children use their time and effort purposefully.

Your child and their development

Executive functions — working memory, inhibitory control, and cognitive flexibility — help children remember a task's requirements, avoid acting at random, and change their approach when needed. These abilities continue to develop throughout childhood. Clear external cues help children carry out actions that are still unfamiliar. [3]

A piano task brings several relationships together: symbol and key, movement and sound, onset and duration, sequence and space. In Soft Mozart, students can explore these relationships within a short passage. Vertical notation and visual cues help connect a note with the keyboard; interaction with the note continues as the sound is sustained and released. This integration of notation, sound, and duration is discussed in the work of Hellene Hiner and Irina Gorbunova. [6]

A practical example. The child has found the correct key. The next task is to keep holding it, rather than look for another key: while the rose opens, the sound continues; the butterfly indicates when to release the key. The child is learning to complete an action, rather than simply start it.

Choose the task according to the results

The goal is to play the entire piece hands separately and together, then from memory and with the orchestra. Use the indicators to decide how much to work on in an individual attempt. If the visual-motor delay thermometer shows red or yellow, invite your child to choose a passage to repeat and review the result. As the actions become established, join passages together and return to the whole piece. Adult support gradually gives way to the student's own decisions.

Adjust the challenge according to the result. If your child spends a long time finding keys and makes frequent errors, shorten the passage. If they play more accurately and find keys more confidently, add a few notes. Change one condition at a time so that you can see what helped or what introduced a difficulty.

Make progress measurable: visual-motor delay and the thermometer

VMD means visual-motor delay. In the Gentle Piano mode used here, this indicator reflects the total time the program waits for the student's required actions. It is not the total performance time: sustaining sounds for their written duration does not, in itself, count as a delay.

The thermometer relates accumulated waiting time to the number of successfully completed notes. Its color helps you adjust the task: when it shows red or yellow, clarify the goal and repeat the selected passage; when it shows green and accuracy is maintained, try the next step. VMD is a teaching indicator for a particular task; the program does not measure eye movements. The numbers and color support decisions about practice, rather than judgments about the child.

A teaching example: the same eight-note passage. The hand part, presentation, and practice conditions stay the same. The figures below illustrate a discussion of results; they are not a benchmark or experimental data.
AttemptCompletedVMDPer note
First8 of 832 sec4 sec
Next8 of 816 sec2 sec
Later8 of 86 sec0.75 sec

The child can see that accuracy has been maintained while less waiting time was needed to find and perform the required actions. Discuss: “What became easier? Would you like to consolidate this result or add a few notes?” Start a new comparison when you choose a new passage. Results from different tasks do not belong on a single scale of progress.

A lower number alone does not explain what the child has learned. Consider accuracy, familiarity with the material, the amount of prompting, and tiredness. If the adult named every key, the figures do not demonstrate independent note finding.

Allow independent correction

The program makes an error noticeable without requiring an immediate judgment from the adult. The spider indicates an incorrect key; Mr. Oops signals an early release. Give the child time to notice the cue and adjust the action.

Instead of: “No, that's wrong again!”
Try: “Look at what the program is showing you.” If the cue is not yet understood, explain its meaning and leave the action to the child.

Research on feedback and self-regulated learning highlights three questions: What is the goal? What has been achieved so far? What next step will help? During a lesson, connect these questions with a specific attempt, then repeat the task and check the chosen approach. [4] [5]

Build confidence on evidence

“You're talented” is an external judgment. “I chose a shorter passage, practiced, and can now play it more accurately” explains a result through the student's own actions. The numbers, sound, and feedback help children connect their decisions with their progress.

This creates opportunities to develop an internal locus of control: children learn to recognize what they can change in their own work. They gain reasons to believe in themselves and become less dependent on others' approval or disapproval. The teacher's support remains important; its purpose is to help students understand, rather than replace their own judgment. A thermometer cannot measure confidence or locus of control; we observe their expression in behavior.

Applying the experience beyond music

A sequence takes shape during the lesson: choose a goal → take action → check the result → adjust the task or approach. To help children use this process in daily life and schoolwork, show them how to recognize a familiar approach in a new situation.

  • Reading: choose a short passage, reread a difficult word, and check whether its meaning has become clearer.
  • Writing: choose one part of a letter, compare attempts, and identify a specific change.
  • Mathematics: return to the task's instructions, identify the step that caused difficulty, and check the correction.
  • Everyday tasks: divide getting ready to go out into steps and check independently that each one is complete.

An adult might ask: “How did you decide what to repeat in music? How did you check the result? Which of those steps could help now?” This makes transfer to other situations part of the teaching process.

Practical guidance for parents and teachers

What to do

  • Learn the technical setup and use your own individual student names.
  • State one specific goal before each attempt.
  • Invite the child to choose the next step based on the previous attempt's results.
  • Allow time to read the feedback and make a correction.
  • Compare the child's own attempts under the same conditions.
  • Consider accuracy, VMD, and the amount of help together.
  • Discuss which action led to the result.
  • Reduce the task or take a break when the child is tired.

What not to do

  • Do not compare the child with other children.
  • Do not turn the thermometer into a grade for ability or effort.
  • Do not prompt every key or press keys for the child.
  • Do not demand speed at the expense of accuracy.
  • Do not increase the challenge simply because the child is now five.
  • Do not mistake improvement with constant prompting for independent learning.
  • Do not describe a difficulty as laziness or a lack of musical hearing.

What to look for

  1. Can the child say what they intend to do?
  2. Do they understand the program's cues?
  3. Do they notice an error and try to correct it?
  4. Is accuracy maintained as VMD decreases?
  5. Are fewer adult prompts needed?
  6. Can the child explain why they chose an easier or more challenging task?
  7. Do they notice tiredness and know how to ask for a break?

A common mistake

Yesterday, the child played an eight-note passage independently with 16 seconds of delay. Today, the delay decreased to three seconds, but an adult named every key in advance. The amount of help changed, so these attempts do not demonstrate independent progress. Repeat the passage without prompts and compare attempts under the same conditions.

The guiding principle

Help children see the relationship between the task they choose, their own actions, and the result. Confidence can then rest on understandable experience: “I can work it out, choose the next step, and learn.”

Research background and sources

The research of Gordon Shaw and his colleagues is relevant here because it examined learning on a keyboard instrument. Rauscher, Shaw, and colleagues' 1997 study involved 78 preschool children, 34 of whom received individual keyboard lessons. Significant improvement in spatial-temporal reasoning was found only in that group; the other spatial-recognition tests showed no significant changes. [1]

Graziano, Peterson, and Shaw (1999) studied 237 second-grade children. Children who combined piano keyboard lessons with a spatial-temporal mathematics program performed better on tasks involving fractions and proportions than children who received the same mathematics program with the control training. [2] These studies concern specific educational programs and measured outcomes. The examples above illustrate the teaching use of feedback in Soft Mozart.

Shaw's research is also presented in the book Keeping Mozart in Mind (2nd edition, 2004). A question relevant to this lesson is how keyboard actions, spatial relationships, and a sequence of problem-solving steps work together. [7]

  1. Rauscher F. H., Shaw G. L. et al. (1997). Music training causes long-term enhancement of preschool children's spatial-temporal reasoning.
  2. Graziano A. B., Peterson M., Shaw G. L. (1999). Enhanced learning of proportional math through music training and spatial-temporal training.
  3. Diamond A. (2013). Executive Functions.
  4. Hattie J., Timperley H. (2007). The Power of Feedback.
  5. Panadero E. (2017). A Review of Self-regulated Learning: Six Models and Four Directions for Research.
  6. Hiner H., Gorbunova I. B. (2024). Guido d'Arezzo's Musical Notation and Their Significance in the Development of Musical Pedagogy through Interactive Digital Technologies in the Digital Age.
  7. Shaw G. L. (2004). Keeping Mozart in Mind. 2nd edition. Elsevier Academic Press.
Next section →

2. The Kingdom of Tune and Harmony

Read, explain, and demonstrate

Seven characters of the Kingdom of Tune

Open Time to Learn! Invite your child to read several pages independently, talk about the characters and pictures, and show the corresponding notes on the keyboard and in notation.

Door helps us remember Do, Rain stands for Re, and Mirror for Mi. Ask your child to explain how a picture helps identify the note name, then find that note on a card and on the keyboard.

Your child can become a reading buddy for a younger child: read the selected pages aloud, introduce the characters, and demonstrate the notes. If reading is still developing, telling the story from the pictures remains an independent task; an adult can help with individual words when asked.

Open the coloring book

Guess Key module icon

45 seconds in the free version

Guess Key — recognizing keys and sounds

What we practice. Connecting a note's symbol, its sound, and its place on the keyboard. As visual prompts are reduced, children learn to listen more closely and use their hearing alongside the remaining cues.

  1. Teach your child to select their own name in My Learning. Open Guess Key from the module menu; before the first attempt, read the help using F1.
  2. Begin at level 1. Let your child independently find the key indicated by the symbol and press it. Once the controls are familiar, they can sing the name of the note they hear.
  3. If the task is completed independently, explore levels 2, 3, and beyond. Compare results at the same level and in the same mode.
  4. If your child completes the task confidently, try letter names using the Akey; return to icons using I.
  5. Next, remove the prompts identifying the sounding notes by pressing 0. Press 0 again to try “turning off the lights.” These are two successive presses of the same key, not the number “00.”

Change one setting at a time. First compare attempts without the familiar prompts, then try the next mode. Some cues remain in the “night” setting: it gradually brings hearing into the task, rather than requiring immediate recognition of every sound without support.

What to do

Let your child choose a mode, complete an attempt, and review the figures. If errors increase, restore the previous prompts and repeat the task.

What not to do

Do not press keys for the child, name every key, or remove all support at once simply to make the task harder.

What to observe

Does the child find the key independently? Do they listen to the sound? Is accuracy maintained after changing modes? Can they explain why they decided to restore the prompts?

Open the demo

What to do

Ask your child to describe a character, demonstrate the character's note, and explain it to a younger child or an adult.

What not to do

Do not retell all the content for the child or turn reading into a speed test.

What to observe

Does the child connect the picture, note name, and note position? Can they explain in their own words and answer a listener's question?

Next section →

3. Fine motor skills and coordination

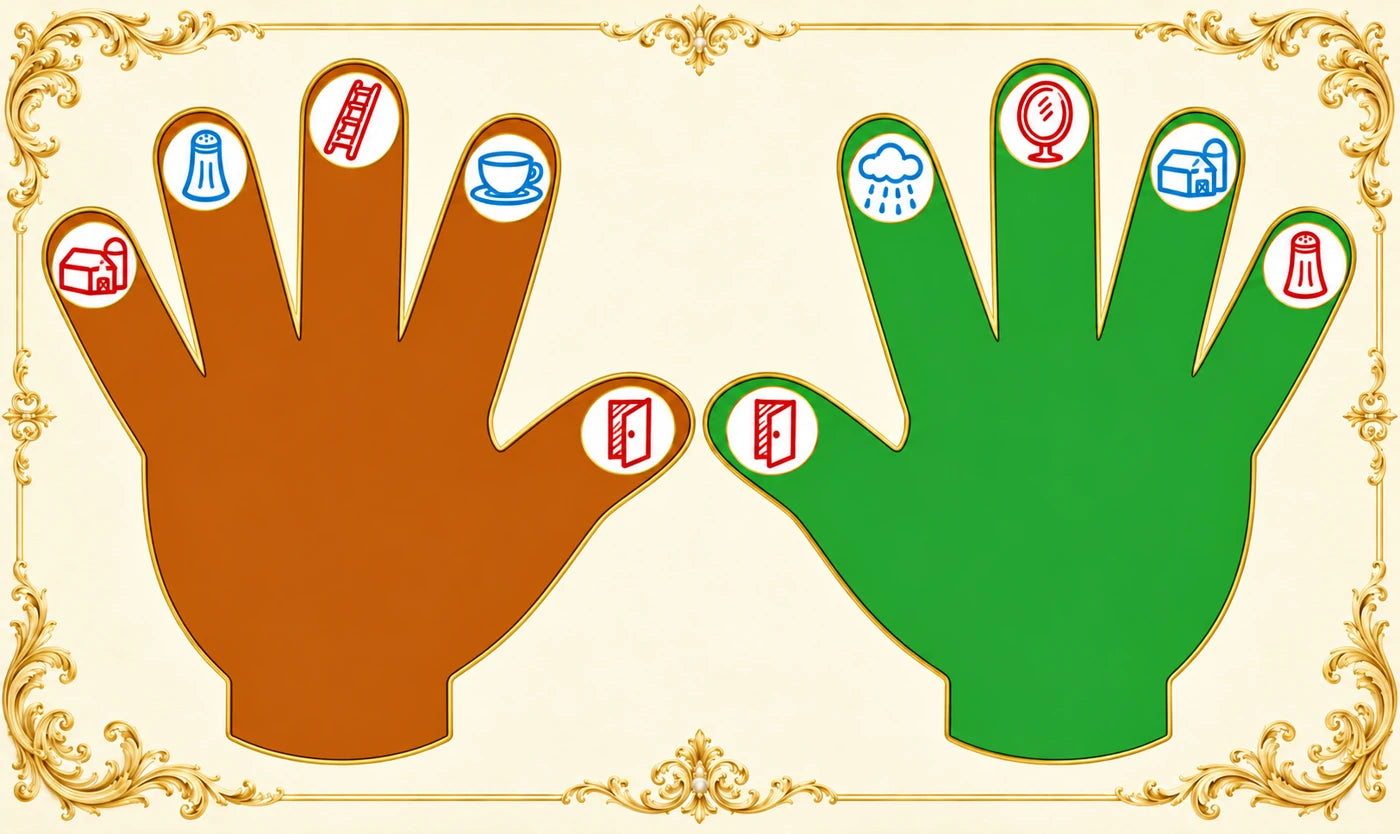
Begin with the hands picture

Right and left hands with note symbols

Download the hands picture

Print the picture. Ask your child to identify the right and left hands, find the thumb, and number the fingers from thumb to little finger: 1–2–3–4–5. The thumb is finger 1 on both hands.

Musical names for the fingers, from thumb to little finger:

  • Right hand: Do — Re — Mi — Fa — Sol; returning: Sol — Fa — Mi — Re — Do.
  • Left hand: Do — Ti — La — Sol — Fa; returning: Fa — Sol — La — Ti — Do.

Invite your child to demonstrate the sequence on their own hands and explain it to someone else.

Five Fingers with Queen Tonica

Watch the demonstration and play the exercise with the right hand, the left hand, and both hands together. Begin with the slow recording at 75% of the original tempo. The regular recording is at 100%.

Alternate between two tasks: singing the solfège note names and saying the finger numbers. When playing with both hands, sing the note names of one chosen hand; say finger numbers in time with the movement.

Slow · 75% of the original tempo
Open the video separately →
Regular tempo · 100%
Open the video separately →

Playing from Do in different octaves

Find another Do key, prepare your hand position, and repeat the exercise in the new octave. Keep the movement sequence the same. Play with each hand separately and with both hands together.

First check the movement without accompaniment, then play with Queen Tonica. Once the sequence is maintained at the slow tempo, try the regular tempo. If coordination breaks down, return to the slow recording and review the point where you stopped.

What to do

Separate the tasks: first the finger sequence, then singing or counting, then playing with the recording. Let your child choose the octave for the next attempt.

What not to do

Do not lift the child's fingers with your hands or hold neighboring fingers down by force. Do not increase speed at the cost of tension.

What to observe

Are finger order and accuracy maintained after changing octaves? Are the hands coordinated? Can the child play and sing without holding their breath or creating unnecessary tension?

Next section →

4. Music theory and ear training

From cards to the musical alphabet

Choose the set that matches the letter name for Ti used in your program: H or B. The solfège note names are the same in both sets. An adult cuts out the cards.

Arrange the sequence Do — Re — Mi — Fa — Sol — La — Ti — Do. You will need two Do cards. Try naming the notes backward. Then start from a different note and find its neighbors. Use the cards to check the order, gradually referring to them less often.

The note-name song with characters from the Kingdom of Tune
Open the video separately →
Before you begin: the child selects their own name in My Learning, finds the module by its name and icon, and checks the controls with F1. The teacher or parent demonstrates one example under their own name, then the student works independently.
Note Duration module icon — playing with mice

45 seconds in the free version

Note Duration — note lengths

What we practice. Duration as an action: starting a sound on time, sustaining it, and ending it. Only one computer key is needed — the space bar — so attention can focus on the length of the sound rather than finding its pitch.

  1. Read the help using F1. When the note reaches the yellow line, press the space bar.
  2. Hold the space bar while the note moves toward the basket with the matching note-value symbol.
  3. Release the space bar above the corresponding basket. In “With mice” mode, the little mice catch fruit that lands in the basket.
With mice: begin with visual support through play.
With mice: begin with visual support through play. The example shows the Russian interface; the 0 key switches modes in either language.

Moving to the mode without mice

Once the controls are familiar, press the number 0 on the computer keyboard. The mice disappear; the baskets with note-value symbols remain. Press 0 again to bring the mice back. The sequence of actions — press, hold, release — stays the same.

Without mice: follow the note values and baskets. Switch modes with the 0 key.
Without mice: follow the note values and baskets. Switch modes with the 0 key. The example shows the Russian interface; the 0 key switches modes in either language.

What to do

Let your child match the note symbol with the symbol on the basket independently. Compare repeated attempts using the same melody, level, and mode.

What not to do

Do not release the space bar for your child or give a command for every movement. Do not require all note-value names to be memorized before the first exploration.

What to observe

Does the child distinguish between a short and a long hold? Do they choose when to release the key independently? Do they notice when a sound ends too early? Is control maintained without the mice?

Open the demo

Note Alphabet module icon

45 seconds in the free version

Note Alphabet — the musical alphabet

What we practice. The order of notes in both directions, and the ability to identify the previous or next note from any starting point in the sequence.

After working with the cards, open Note Alphabet. Use the arrow keys ← / → to move the falling note into the correct place in the sequence. Once the position is correct, the space bar speeds up its descent. Check the controls with F1.

Start with icons using the Latin-letter key I. Once your child works confidently, try letter names using A. The cards can support independent checking; then put them aside.

What to do

Ask your child to explain one move: which note belongs before or after the given note? Complete an attempt and compare it with the previous one in the same mode.

What not to do

Do not limit the task to memorizing the sequence only from Do and only forward. Do not press the space bar before choosing a position.

What to observe

Can the child continue the sequence in both directions? Can they identify a neighboring note without reciting the whole sequence from the beginning? Is accuracy maintained when the notation system changes?

Open the demo

Fruit Lines module icon

Level 1 · 45 seconds in the free version

Fruit Lines — note position and name

What we practice. Connecting a position on the staff with its note name. The child distinguishes lines from spaces and uses the note sequence to choose the correct basket.

Select level 1. Use the arrow keys ← / → to move the basket with the correct name beneath the falling fruit or flower bud. The space bar speeds up the descent after a basket has been selected. Before starting, check the controls with F1.

Let your child notice where the fruit appears — on a line or in a space — and connect that position with the note name. In the free version, complete a 45-second attempt.

What to do

After the attempt, review one example: position on the staff → note name → matching basket. Repeat level 1 and compare results.

What not to do

Do not require every level to be completed during the first exploration. Do not speed up the descent while the child is still choosing a basket.

What to observe

Does the child distinguish a line from a space? Do they use the note sequence? Are random movements becoming less frequent?

Open the demo

Treble Staff Puzzle module icon

45 seconds in the free version

Treble Staff Puzzle — treble clef

What we practice. Each note's place on the treble staff: note name → corresponding line or space. This reverses the task of identifying a note name from a given position.

Read the help using F1. Use the arrow keys ← / → to guide the note to the correct line or space. Correctly placed pieces build a picture. The space bar speeds up movement after a position has been chosen.

Start with icons. Complete a separate 45-second attempt. Compare treble-clef and bass-clef results separately.

What to do

After one placement, ask your child to show where the note belongs and explain why they chose that position.

What not to do

Do not give the position of every note. Do not judge the work solely by how quickly the picture is completed.

What to observe

Does the child distinguish neighboring lines and spaces? Do they recognize a position when it appears again? Can they correct a choice after the program's feedback?

Open the demo

Bass Staff Puzzle module icon

45 seconds in the free version

Bass Staff Puzzle — bass clef

What we practice. Each note's place on the bass staff: note name → corresponding line or space. This reverses the task of identifying a note name from a given position.

Read the help using F1. Use the arrow keys ← / → to guide the note to the correct line or space. Correctly placed pieces build a picture. The space bar speeds up movement after a position has been chosen.

Start with icons. Complete a separate 45-second attempt. Compare treble-clef and bass-clef results separately.

What to do

After one placement, ask your child to show where the note belongs and explain why they chose that position.

What not to do

Do not give the position of every note. Do not judge the work solely by how quickly the picture is completed.

What to observe

Does the child distinguish neighboring lines and spaces? Do they recognize a position when it appears again? Can they correct a choice after the program's feedback?

Open the demo

Free and full versions

In the free version, play in each module lasts 45 seconds. The full version offers more complex and extended algorithms. Exploration of the modules can be spread over several sessions.

After each attempt, record the module name, level, mode, time, and displayed results. Compare the child's own attempts under the same conditions. Scores from different modules are not combined into an overall assessment of ability.

Next section →

5. Playing the piano: Happy Birthday

First, learn the controls

Gentle Piano module icon

Open Gentle Piano → Happy Birthday. Press F1to read the help. S starts playback, R selects the right-hand part, and L selects the left-hand part. These are computer keys; play the music on your connected instrument.

Open the demo

Play the entire piece hands separately and together

Select your own name and presentation 1. Listen to Happy Birthday, then play the piece with the right hand, the left hand, and both hands together. Check F1 for hand selection and repeat controls.

Hold the key while the rose opens; release it when the butterfly appears. The spider indicates an incorrect key. If a sound ends too early and Mr. Oops appears, press the required key again and hold it.

Give your child time to interpret the cue and correct the action independently. First learn to find, hold, and release the required keys; refine fingering as these actions become established.

Use VMD to choose how much to repeat

If the VMD thermometer shows red or yellow, choose a passage to repeat. Keep the same hand selection and presentation, complete several separate attempts, and compare the figures. If necessary, shorten the passage or return to one hand.

When actions become more accurate, VMD decreases, and less help is needed, join passages together. Return to playing the entire piece. Consider the green color alongside the number of successful notes and incorrect key presses.

The child can suggest the next step: “I'll repeat this part,” “I'll join two passages,” or “I'll try both hands.” Ask them to explain their choice using their results.

Playing from memory

After practicing with the notation, use Gentle Piano's option to hide the notes of the selected part; check the command in F1. Play from memory with the right hand, the left hand, and both hands together.

If the sequence breaks down at a particular point, restore the notation, review that passage, and test it from memory again. Then play the entire piece without looking at the screen, listening to the melody and accompaniment.

Playing with the orchestra

Open the orchestra page and select the slow recording. Listen to the introduction, identify when your part begins, and play the entire piece with accompaniment. You can also practice each hand with the orchestra before combining them.

When your child maintains the sequence and can listen to the accompaniment, move to the regular tempo. If they lose their place, find the passage in Gentle Piano, repeat it, and return to a complete performance with the orchestra.

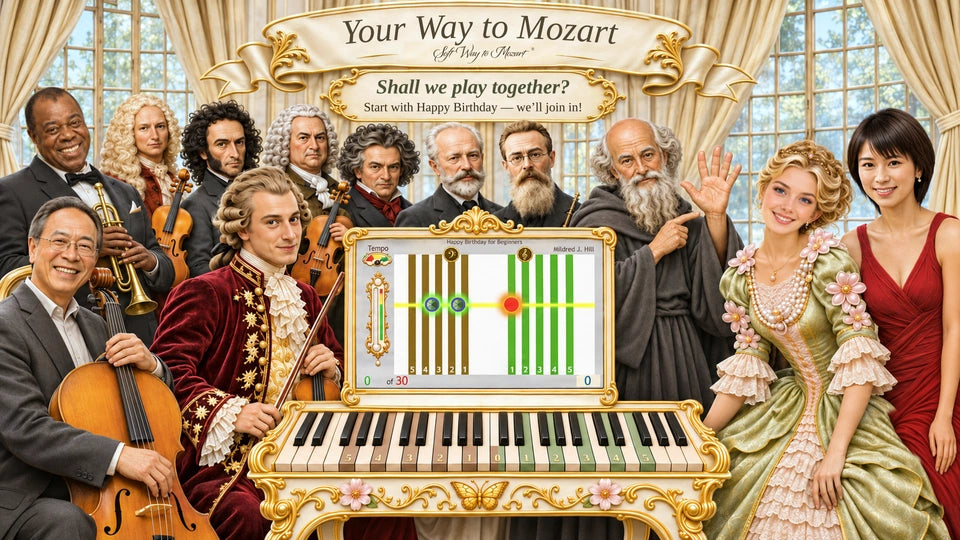
The orchestra invites you to play Happy Birthday together

Happy Birthday

Ready to play with the orchestra?

Start slowly.
Then perform at the regular tempo.

Play with the orchestra
On the orchestra page

Illustrated guidance and two orchestral arrangements: slow and performance tempo.

What to do

Alternate between reading notation, repeating a selected passage, playing from memory, and performing with the orchestra. After each attempt, discuss one next step.

What not to do

Do not name every key in advance. Do not consider the piece learned solely because the thermometer is green. Do not require performance tempo before the playing is coordinated.

What to observe

Does your child sustain sounds to their completion? Do they correct errors independently? Can they recover the sequence from memory? Do they hear the introduction and stay connected with the orchestra?

Next section →

6. Musical culture and listening

A familiar song in the wider world of music

Listen to Igor Stravinsky's Greeting Prelude. The composer used the Happy Birthday theme and gave the familiar song an unexpected orchestral sound.

Tell your child: “You've already tried playing this song. Now let's listen to what a composer does with it and how an orchestra performs it.”

Watch the orchestra

Oslo Philharmonic.
Conducted by Vasily Petrenko.

Watch the performance

Listen to the composer's recording

Columbia Symphony Orchestra.
Conducted by Igor Stravinsky.

Listen to the performance

Find other interpretations of Happy Birthday

Find another performance of Happy Birthday: vocal, piano, or orchestral. Your child can suggest a version and explain the choice. An adult helps open an appropriate recording.

Compare two performances using one feature: tempo, performers, character, dynamics, or accompaniment. Ask your child to identify a specific moment where they noticed a difference.

When introducing Greeting Prelude, name the composer: Igor Stravinsky. Before listening again, sing the familiar theme and try to hear how the composer transformed it.

What to do

First listen to the complete work. Then choose one question and listen again to the relevant passage. Invite your child to tell a younger child or an adult about their discovery.

What not to do

Do not dictate which feelings the music “should” evoke. Do not turn listening to performances into a quiz with prescribed answers.

What to observe

Can the child support an observation with a specific musical passage? Do they distinguish melody from accompaniment? Do they notice that a familiar song can be interpreted in different ways?

Keep a record of your own progress

Record the date, chosen task, conditions, and result. Save a short video of an ordinary performance. At the next session, compare what your child does more accurately and independently, and invite them to choose what to repeat or make more challenging.

Continue learning with Soft Mozart

The next lessons will build on these first musical discoveries: helping your child read and sing notes, play pieces, and listen to and understand music — at their own pace, with your support.

You can study independently or with our certified teachers, online or in person. On the forum, you can ask questions, share achievements, and connect with other families and teachers.

We hold concerts and assessments and nominate participants for medals and diplomas. Early practice at home can be the beginning of a lasting musical journey.

Join Soft Mozart — learn, share discoveries, and grow with us!

© 2026 Hellene Hiner · Soft Mozart · Level C · Ages 5+ · English editionBack to the top